Where Do Good Valve Maintenance Practices Begin?

Follow these best practices to be confident in your valve installations:

✔ Always follow the manufacturer’s installation instructions. Read the instruction manual, attend training sessions, or watch videos in order to understand the proper steps of assembly and disassembly.
✔ Be aware of the capabilities and operating parameters of the system. For example, a valve should never be placed into service where the temperature or pressure inside the system exceeds the ratings of the valve.
✔ Allow adequate space for access and future maintenance. Maintaining a valve is typically a hands-on activity. Make sure you place valves in locations that are easily accessible, when possible.
✔ Mount valves securely to a fixed location whenever possible. Use adequate supports for the tubing or piping where possible on both sides of the valve to minimize vibration.
✔ Ensure the proper orientation of the valve to allow media to flow in the correct direction
✔ Check for leaks after installation
✔ Avoid contaminants. You can do this by adding filters to your fluid system to help remove particulates that may interfere with proper valve operation. Such particles can cause damage to valve seats, contaminate your process fluid, and reduce overall flow throughout your system.
Taking these things into consideration during the installation process can help best set up your valve for reliable operation over the long term.
How Do You Perform Preventative Valve Maintenance?
Developing a valve preventative maintenance (PM) schedule after installation helps ensure reliable operation. Tailor the schedule to your system’s needs, considering factors like pressure, temperature, process fluid, and valve usage. Consult your valve supplier for specific maintenance recommendations.
Regardless of your parameters, the goal of any valve maintenance program is to periodically verify that your valves are operating properly. The most common indicator of improper operation is a leak, be it minor or significant. Leaks can be detected with your own senses—you may smell a chemical leak before you can find it visually, for instance—or with ultrasonic equipment and liquid leak detectors. Catching a valve leak can help prevent a more serious problem that could occur if the leak were to continue undetected.
What is the First Step in Valve Maintenance? Safety.
Reference your company’s safety procedures before performing any valve servicing or repair on individual valves. Certain worn or damaged components on a valve can be repaired or replaced; to identify which ones, always consult the manufacturer. When in doubt, replace the valve entirely to ensure safety.
Some common causes of leakage are unreliable metal-to-metal seals, contaminants in the system, improperly installed end connections, and poor tubing selection and preparation.
Valve Servicing and Troubleshooting Techniques
TEST - Verify its operation and determine the nature of the leak. There are two main forms of valve leakage:
- A seat leak, where the leak is contained inside the valve, but fluid passes through the seal and the valve is unable to stop the flow
- A shell leak, where fluid leaks outside of the valve into the atmosphere, often through the stem or body of the valve.
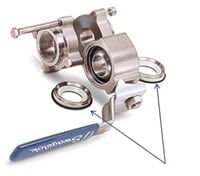
INSPECT - Examine all internal components, including the seats (a key part of ball valve maintenance), O-rings, and stem tips for wear or damage.